19+ Types of Retaining Wall Materials and Designs
Certain types of retaining walls are going to be better for your needs than others. If you have a specific project in mind for your lawn or garden and you want to get the best retaining walls for the situation, then you need to familiarize yourself with some of the differences that exist between these different types of products.
If you take the time to do this, then you have a much better chance of choosing a product that is going to work well for you right now and in the long run. Spend some time looking over information about the different types of retaining walls, so that you can make a wise choice in the end.
Before you can really decide which type of retaining wall is best for your situation, you are going to need to think about where you want to put a sheet pile retainment wall and what purpose you want it to serve.
Are you trying to build a retaining wall because you want it to serve a functional purpose, or are you more concerned with building a decorative retaining wall?
What you are trying to achieve will definitely matter, so you should be careful to think over your goals and aims before you decide on any one type of retaining wall. Also, where you want to place the retaining wall in your yard will matter, and you must consider what kind of earth or soil you will be dealing with.
Look for retaining wall ideas and retaining wall contractors at FarmFoodFamily
Table of Contents
A. Main Types of Retaining Walls
There are four main types of retaining walls that you should be aware of if you are considering installing one of these structures in your home. The first type of retaining wall that you should consider is a gravity retaining wall.
These walls work by using their weight to resist the pressure of the ground that is behind them. Because of the way that these walls are constructed, gravity will hold back the earth and soil behind them.
Usually, gravity retaining walls are constructed at heights of only three of four feet. These are not the easiest walls to build and it can get difficult to construct them properly if you want to make them much higher than four feet.
Another type of retaining wall that you should consider when doing your home project is a cantilevered retaining wall. These types of walls are made using reinforced concrete.
There are two main parts to a cantilevered retaining wall, a very thin stem and a base that is divided into two parts, a heel, which is under the back fill, and a toe, which is the remaining portion of the base.
One major benefit of these types of retaining walls is that they use a lot less concrete than something like a gravity retaining wall. However, they can sometimes be much more difficult to design properly and require lots of care to be taken during the construction process.
There is another type of retaining wall that homeowners sometimes use for their projects: sheet pile retaining walls. A lot of homeowners tend to use these types of retaining walls when they are dealing with a small space and soil that is very soft.
Usually, with these walls, two-thirds of the actual wall is below ground and only one-third of the wall is actually above ground. Most often, these types of walls are made using wood, steel, or vinyl, and materials like stone is not used in a construction such as this. If you are looking for an option that is less expensive, then this may be the type that you want to go with.
You can actually choose to go with any one of these types of retaining walls, gravity, cantilevered, or sheet pile, and have it be an anchored retaining wall. These structures have added strength, because they use cables or stays that are anchored into the soil or the rock which is behind them.
These types of retaining walls are often really technically complex, and can be difficult to construct. Unlike other types of retaining walls, which can be completed as a home project, these one should definitely not be completed on your own. This type of retaining wall is often used when the wall has to be very slender and would be too weak without the anchors.
B. Getting the Right Retaining Walls
If you are not sure what types of retaining walls that you need for your project, then it’s a good idea to consult with an expert who can help you with these issues.
Many landscapers are familiar with these structures and can easily help you identify what kind of retaining walls would be best for your specific situation. Keep in mind, though, that all landscapers do not deal with retaining walls, so they might not have the professional information and experience that you are looking for.
#1. Piling Walls
Piling walls are great for retaining and maintaining large masses of land like slopes, vegetated hills, embankments, or planter boxes.
They are generally reserved for usage on extremely large structures that need to bear a great load, but is possible to have smaller piles installed for usage on things like planter boxes and residential retaining walls.
There are many different styles of piling walls. Each has its particular usage and strengths. There are adfreeze, soldier, auger, drilled, under reamed, single, suction, tripod, sheet, and micropile styles.
If you do your research, you will be able to figure out which style will work best for your needs. Whether you are a homeowner looking to build a simple wall in your home or if you are a contractor looking to tackle a big job, you can find the right solution for your project.
Different Types and Methods
Adfreeze piling walls are intended for usage in extremely cold weather. They are commonly used in places like Canada and Alaska that experience constant permafrost.
The material in adfreeze is very technologically advanced. It forms a special bond with the frozen subsurface. The freezing temperatures actually strengthen this type of piling wall. The only weakness of these walls is that their integrity will be compromised if the ground thaws out too much.
Suction piling walls are used in sand that is submerged under water. These are commonly used in the construction of bridges that span waterways.
To install them, the hollow piles are set into the sand. Then, special pumps suck the water out of the center of the tubed piles. This forces them further into the ground.
The wet sand forms a very strong base of support, allowing walls to be constructed that are durable and stiff. These can be installed in small residential ponds or even streams as long as the seabed is sand.
Soldier piling walls are another common style for residential usage. These are made when vertical piling posts are driven into the ground. These can be made of wood, metal, or many types of stone. They are shaped like an H. These slots allow horizontal lagging to be slotted between the pilings. There is actually much freedom in design these walls. For instance, you could have steel piling with wooden lagging. Of course, using different materials for the lagging will have different structural results. These soldiers are not ideal for all types of soils. If a hill is particularly wet and gets a lot of run off you will not want to use this style of wall. But they can bear an incredible weight and they can be made in varying thicknesses to accommodate varying load sizes.
Different Installation Methods
There are many different ways to install piling walls. Some piling walls are pound into the earth with tripod systems. These are good for smaller jobs and they are very mobile. They are not ideal for large jobs because they can be flimsy. The suction method is primarily used for underwater installations. Sheet piles are used for temporary walls.
But, the most commonly used installation technique is drilling with cranes. These cranes come in varying sizes depending on the size of the project. These machines can bore shaft of extremely large diameters deep into the ground.
The type of boring technique that they use will depend on the size of the bore and geology of the soil. That is to say, some soils will require a wet bore, while other will require a dry bore. Dry bores are used to keep water from the sol from infiltrating the bore. All of these different methods aim at producing a casing in which the piling can then be set into.
When building piling walls it is truly all about the foundation. If the soil is not strong then the wall will not be stable. Likewise, if the piling is not laid deep enough into the foundation, the wall will not be strong enough. This is why it is necessary to engineers who are geologically trained evaluating the project beforehand. The strength of the walls will largely depend on the depth of the pilling and the diameter of the piling. You cannot merely guess how deep you need to bore and how thick the piles need to be. It must be professionally assessed, even if you are working on a small project.
Piling walls can be used in all sorts of environments. They are built on massive, stadium sized scales, but they are also perfect for residential usage. Certain types will be better for certain usage, so be sure to consider the different methods and styles. If you do you research you will definitely be able to find a solution that will fit your budget.
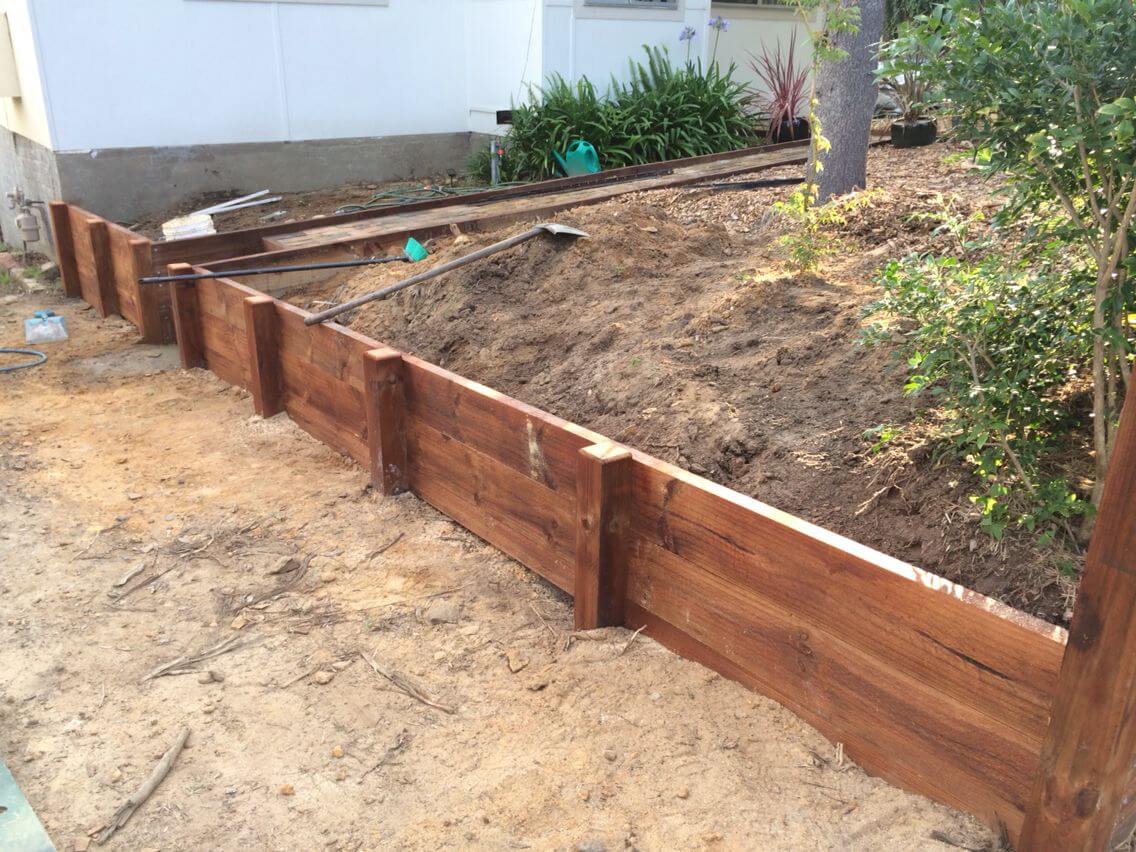
#2. Cross-tie Timber Repair
Cross-tie timber repair is very manageable if you have the proper resources. It is very easy to work with and it is cheap to fix. Many homeowners repair their cross-tie timber on their own. With simple and inexpensive woodworking tools you can fix your damaged structures on your own. Cross-tie timber walls are great for the construction of retaining structures.
Railroad ties offer a traditional a style and organic feel that is very attractive to potential buyers. But, they are also ideal for wall construction because they are very strong yet inexpensive. And, most importantly, they are lightweight and easy to install. This makes the repair very quick and cheap.
The installation of other types of retaining walls is much more complicated and expensive than cross-tie timber repair.
Tile, stone, structures of detention and other concrete products are often sued in for retainers. These are very good options but they can be difficult to maintain.
Maintaining stucco on a concrete structure that is submerged in the soil can be very difficult. Stucco also needs to be painted this can be especially difficult as plants and shrubs grow up. Painting around the plants in your yard can be very difficult and time consuming.
Bricks and stones are also good substitutes for cross-tie timber but they also have many drawbacks. Installing these heavy concrete blocks is much more labor intensive. They are also problematic because the pieces are much smaller so it requires much more painstaking installation. Also, if you use mortar on your wall it can make the installation and repair much more strenuous. If you need to do repair on a brick or stone wall, it can be very hard to make the grout colors match because it will fade over time. The simplicity of cross-tie timber repair is one of the products most attractive features to many homeowners.
Using Reclaimed Wood
Cross-tie timber repair is very easy because the planks of wood are very long. So, during the installation you have much fewer pieces to actually lay out. Cross-tie timber repair is also easier because these walls do not require any type of fastener, mortar, or adhesive if they are properly installed. The weight of the wood and the backfill of the soil will build up a strong, weight-bearing structure that will not shift. With few cracks and crevices, cross-tie timber will be less susceptible to leakage.
Cross-tie timber repair is also quite easy because many homeowners choose a reclaimed wood product. Much of this cross-tie timber planks are reclaimed railroad ties. This means that each plank is unique and has varying colors that add to the style of each piece. This is part of the appeal of this amazing product. But, this is also why it is such a practical product to repair. You do not need to worry about finding the right replacement piece to math with the colors and textures of your existing wall. The whole point of the reclaimed wood style is to make the structures look unique and antiqued. They will give your yard a smart look and unique style that will make your property stand out from your neighbors.
Finding The Right Product
Finding a reclaimed or new cross-tie timber repair site is not very difficult. You can find a supplier that will have style of wood that matches with the aesthetic of your yard. It is also very easy to find all the tools and supplies that you will need to repair your cross-tie timber. There are many different products but you need to make sure that you choose a wood that has been properly treated so it can withstand the affects of wet soil. If wood is not properly treated it may not be very durable for usage among soil and moisture. But if it is properly treated before it is installed, it can last for hundreds of years while submerged in soil without much maintenance.
Cross-tie timber repair can add much style and functionality to your yard. It can help educe the effects of storm run off. It is also great for reducing erosion in your yard. With the right product you can keep your soil healthier and make it more ideal for planting gardens, plants, trees, flowers, and grass. No matter what type of landscaping you plan on having in your yard, cross-tie timber repair can assist you. It is affordable and easy to do without professional help. You can hire professional contractor but this will cost you more money. The unique look of it makes it very attractive to homeowners who want to make their home stand out. It is a particularly good way to improve the curb appeal of your property if you are planning on selling in the near future.
#3. Soil Nail and Shotcrete Walls
Soil nail and shotcrete walls are a great for permanent and temporary retaining structures of all shapes and sizes. Whether you are looking to maintain the structure of slope in your yard or fortify a hill for a major construction process, soil nail and shotcrete walls may be the perfect solution for your project. Much like installing piling walls, the actual installation of these types of walls is not too complicated, but major technical engineering and analysis may be necessary, especially on larger walls. Before installing such a nail wall, engineers will have to determine what the exact specifications of the nail wall will have to be to retain the load. The installation is relatively quick, so shotcrete is often used for temporary walls.
The time and cost of installing soil nail and shotcrete walls is completely dependent on the size of the wall and the weight that it will bear. Small soil nail and shotcrete walls are cheap and easy to install. This is mainly because the nails can be installed with handheld electric or pneumatic tools. But large soil nail and shotcrete walls require massive drilling machines that must be operated by specialists. This of course means that the entire process will be much more expensive and complicated.
Evaluating Your Wall
The first step in the process of having soil nail and shotcrete walls installed is having the potential slope analyzed by geological engineers. This is not to say that you need to find a special scientist. The contractor will have such specialist within their company to handle the analysis. They will give a report to the possible contractor and you, informing you of the extent, cost, and time it will take to complete the walls. There are many variables that may affect these factors. Most of these factors are scientific and hard to understand. But you should know that they would evaluate the structural integrity of your slope or hill. If your soils are soft, dry, or too clean they will not have very good adhesive properties, so you wall will, therefore, require more nails. And if your wall is especially tall then it will have to bear much more weight.
In the next step, the installation of your soil nail and shotcrete walls will begin. The installation needs to be handled by highly trained professionals. Whenever you hire contractors make sure that they are licensed and bonded within your home state. This will ensure that you will not be held financially or legally responsible for any harm or accident that happens during the construction. For instance, if a nail bursts an underground water pipe or gas line you will not have to pay for the repair. A good contractor will be able to give you a rough estimate of the final cost and date of completion. Of course, once the construction beings there are often roadblocks that may require more time and more money to get around. But this is all part of the process. Such roadblocks are inevitable and should not discourage you.
The Basic Steps
To comprehensively explain the process of installing soil nail and shotcrete walls would take a long time. There is much science and construction vocabulary that most customers are not very familiar with. Basically, each soil nail is driller into a predrilled holes on the face of the slope. These nails are specially designed to fortify the soil of the subsurface. Soil will clump around the nail creating a large mass that makes the soil much harder and supportive then it was before. Each soil nail is attached to a mesh-like façade. This usually consists of steel rebar on large structures or rabbit proof mesh wiring for smaller walls. This contains the soil and keeps it from crumbling.
The next step is the actual spraying of the shotcrete. Shotcrete is a liquidized concrete that can be sprayed on site through special hoses. This is a very common construction method. It is used on everything from backyard pools, to skyscrapers, to freeway retaining walls. Shotcrete can even be mortar. This will be a rougher look, but it will be very strong. Mortar shotcrete is often used when the final wall will have a façade over it. It is possible to finish off any retaining wall with many different types of fronts. A perfectly vertical shotcrete wall can be finished with stones or bricks to give it a more aesthetic look. It can also be painted or stucco to various degrees.
Soil nail and shotcrete walls are very effective retaining systems. They are cost effective and very durable. They are perfect for the sides of giant interstate highways and they are ideal for usage in residential landscaping. It is a great technology that you should consider when building a retainer wall.
#4. Piling Walls
Piling walls are great for retaining and maintaining large masses of land like slopes, vegetated hills, embankments, or planter boxes. They are generally reserved for usage on extremely large structures that need to bear a great load, but is possible to have smaller piles installed for usage on things like planter boxes and residential retaining walls. There are many different styles of piling walls. Each has its particular usage and strengths. There are adfreeze, soldier, auger, drilled, under reamed, single, suction, tripod, sheet, and micropile styles. If you do your research, you will be able to figure out which style will work best for your needs. Whether you are a homeowner looking to build a simple wall in your home or if you are a contractor looking to tackle a big job, you can find the right solution for your project.
Different Types and Methods
Adfreeze piling walls are intended for usage in extremely cold weather. They are commonly used in places like Canada and Alaska that experience constant permafrost. The material in adfreeze is very technologically advanced. It forms a special bond with the frozen subsurface. The freezing temperatures actually strengthen this type of piling wall. The only weakness of these walls is that their integrity will be compromised if the ground thaws out too much.
Suction piling walls are used in sand that is submerged under water. These are commonly used in the construction of bridges that span waterways. To install them, the hollow piles are set into the sand. Then, special pumps suck the water out of the center of the tubed piles. This forces them further into the ground. The wet sand forms a very strong base of support, allowing walls to be constructed that are durable and stiff. These can be installed in small residential ponds or even streams as long as the seabed is sand.
Soldier piling walls are another common style for residential usage. These are made when vertical piling posts are driven into the ground. These can be made of wood, metal, or many types of stone. They are shaped like an H. These slots allow horizontal lagging to be slotted between the pilings. There is actually much freedom in design these walls. For instance, you could have steel piling with wooden lagging. Of course, using different materials for the lagging will have different structural results. These soldiers are not ideal for all types of soils. If a hill is particularly wet and gets a lot of run off you will not want to use this style of wall. But they can bear an incredible weight and they can be made in varying thicknesses to accommodate varying load sizes.
Different Installation Methods
There are many different ways to install piling walls. Some piling walls are pound into the earth with tripod systems. These are good for smaller jobs and they are very mobile. They are not ideal for large jobs because they can be flimsy. The suction method is primarily used for underwater installations. Sheet piles are used for temporary walls.
But, the most commonly used installation technique is drilling with cranes. These cranes come in varying sizes depending on the size of the project. These machines can bore shaft of extremely large diameters deep into the ground. The type of boring technique that they use will depend on the size of the bore and geology of the soil. That is to say, some soils will require a wet bore, while other will require a dry bore. Dry bores are used to keep water from the sol from infiltrating the bore. All of these different methods aim at producing a casing in which the piling can then be set into.
When building piling walls it is truly all about the foundation. If the soil is not strong then the wall will not be stable. Likewise, if the piling is not laid deep enough into the foundation, the wall will not be strong enough. This is why it is necessary to engineers who are geologically trained evaluating the project beforehand. The strength of the walls will largely depend on the depth of the pilling and the diameter of the piling. You cannot merely guess how deep you need to bore and how thick the piles need to be. It must be professionally assessed, even if you are working on a small project.
Piling walls can be used in all sorts of environments. They are built on massive, stadium sized scales, but they are also perfect for residential usage. Certain types will be better for certain usage, so be sure to consider the different methods and styles. If you do you research you will definitely be able to find a solution that will fit your budget.
#5. Helical Anchor Walls
Helical anchor walls are a great system to use in the retaining walls of residential properties. Retainers are very important to have in residential landscapes. They help to segregate soils and reduce the effects of erosion on slopes and hills. Anchor walls are commonly used on a much larger scale because they are so strong and can bear such a large load. Many people do not understand exactly how these anchoring systems or even soil nail with SRW works. But, it is a very effective way of making a stable wall that can prevent erosion on massive slopes and hills. Helical anchor walls are often used in gigantic engineering projects like freeways and skyscrapers.
The anchor system is very complicated. These anchors can be installed quite easily on existing structures to add strength to them. Basically, a giant galvanized nail with anchors on it is drilled horizontally, through a vertical wall. These anchors bear deep within the soil to add much stability to the wall and the soil within. This is a very technical engineering process that must be handled by professionals. The soil must be professionally surveyed to ensure it will be able to bear the weight. It is also must be surveyed to make sure that there are no pipes or gas lines in the way. When helical anchor walls are properly installed, they can bear a tremendous weight.
Low Key Installation Process
The process of installing helical anchor walls is relatively low key. The hardest part of the helical process is the preparation and precautionary surveying. It can be done during any month of the year and it does not take long. The helical anchors are bored through the existing structure and then a steel plate keeps them in place. The system is great because the anchoring nails stabilize the soil within the wall. In turn, the now more stable soil, stabilizes the wall itself. This cyclical strengthening makes them nearly indestructible.
Helical anchor walls are usually used in large scale construction like for the footing of houses or on large sloped hills. But, there are small helical anchor systems that can be used as basic retainers in landscaping. These are ideal for planter boxes around large trees or big bushes. The helical anchors are made of the strongest galvanized steel so they will not rot or deteriorate due to soil or water.
Many people who have deteriorating or falling retaining walls think that the only option is to completely remove the walls and put in new ones. But this is not the most efficient or inexpensive way to handle fixing this problem. Helical anchor walls can quickly and effectively solve the problem. They are a permanent solution that is very affordable. The anchors will pull a slumping wall upright. Depending on the severity of the problem you may have to use more anchors. Once the anchoring system is in place it can be covered up quite easily with stucco or, if the wall is underground, by soil. Helical anchor wall systems are not just for underground usage, they can be used on exposed walls and covered.
Professional Installation
When it comes to hiring a contractor to handle the installation of your helical anchor walls you will want to make sure that you hire a crew that is licensed, bonded, and insured within your home state. This way you can be safe in the knowledge that you will not be held legally or financially culpable for any problems during the job. For instance, if an anchor punctures a water line the construction company will have to fix it or pay for the repair. Likewise, if somebody is injured during the installation you will not be responsible for any medical bills. If you do your research, you will be able to find a professional contractor who can handle your job with great speed and professionalism.
Helical anchor walls are also used in the initial construction of many structures. They are not merely reinforcing systems. Many engineers prefer these systems because they are so sturdy. A freestanding concrete wall will never be able to retain as much weight as one with helical anchors. The installation process is quick and affordable, but you will save the most money down the road because it will not need to be reinforced or repaired.
Helical anchor walls are complicated structures that will last forever if properly installed by an expert. Make sure you hire a reputable contractor with much experience with these systems before you sign any contracts and begin the construction. They are a great way to fix old walls but they are also great for the construction of new ones. So, do not simply tear out your old, failing wall before your consider such anchor solutions.
C. Retaining Walls Cost
When designing, you should keep in mind the retaining walls cost. You will have to calculate how long the walls will be, the depth of the walls, and what kind of materials. Concrete is the obvious choice, but most people either cover this or completely replace it with a more eye-pleasing choice such as brick or wooden logs.
You may also choose to match the walls to your house. In either case, the cost of the amount of materials will need to be taken into consideration before you start your project. It is not a good idea to start your project and need to stop halfway through because you did not plan for costs.
Retaining wall blocks can cost as much as several dollars per block, so even the slightest miscalculation can throw your project off budget. A retaining wall of wood is a slightly more aesthetic and in some cases, a cheaper alternative to masonry.
Building retaining walls requires simple mathematical knowledge and the skills to employ this knowledge. Improperly built walls can result in not only wasted time and money, but can also cause damage to your property.
Many homeowners decide to leave installing retaining walls to experts, but it is simple if you understand the process. Usually, the wall uses its force to hold the pressure of the soil in, without collapsing.
This can be accomplished by burying the wall deep in the ground, attached to a base, or by anchoring it in some other way. Another tactic is to create a sloping wall that is partly buried in the ground, to create resistance to the force exerted by the filler soil.
Whichever way you choose, you need to be sure your retaining walls will hold up. Straight, plain garden walls will collapse quickly when used as retaining walls. Proper bracing is essential to build a lasting wall.
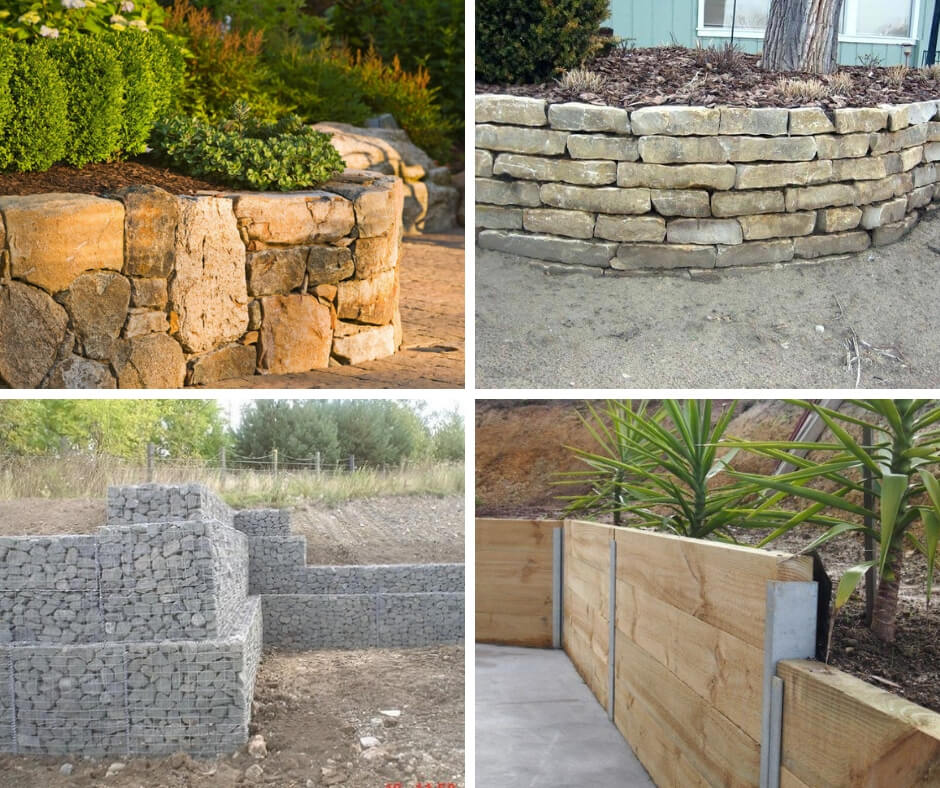
Retaining walls may hold thousands of pounds of soil; so needless to say, weak walls can have disastrous consequences. A poorly constructed wall may cave in under even a few hundred pounds of dirt. A retaining wall may be built from concrete blocks, pressure-treated wood, bricks, natural stone, or a variety of other suitable materials. What you choose is up to your design and needs.
D. Choosing Materials for your Retaining Walls
#1. Concrete blocks
#2. Poured Concrete
#3. Timber
#4. Boulders

#5. Stone veneer
#6. Wood
#7. Brick
#8. Gabion
Gabion basket structures are great for the construction of retaining walls, retaining walls with poured concrete, and other such construction. But, most people do not exactly understand what gabion basket structures are. These baskets are basically a series of rectangular or square baskets that are made out of some sort of metal wiring. This wiring will vary in thickness and strength depending on the size of the wall and the weight it will have to bear. These mesh structures are bound together to make a series or row of containers that can then be filled with rock. Each wire basket is filled to the top to make the overall structure very strong.
The size of each basket obviously depends on the scale or the wall. Larger walls can have baskets that are over six feet tall. Smaller gabion basket structures may be only two feet tall. The material that is used to fill each structure is also dependent on the size and scale of the wall. Basket structures are filled with rock, sand, soil, rubble, or riprap. Riprap is basically any collection of random rocks and dirt that is used in these structures. Once they are filled the baskets are stacked on top of each other. They are filled to the brim to make the wire frames tight and structurally sound. They are usually recessed and laid at a slope. They are not as strong when they are stacked vertically.
Using On Rivers And Streams
Basket structures are commonly used on embankments like those that are on the side of rivers and streams. When the baskets are stacked atop each other and properly lined up, they amass to make very strong and long lasting structures. The wire baskets prevent water and flooding from washing away the rocks.
You can put rocks and riprap that are native to the soil to make the gabion wall blend in with the natural environment. Rivers and stream can flood and drag away soil on an embankment that may be vital to your property. This will protect trees and bushes along such streams and rivers. In fact, gabion basket structures become stronger as time goes on because they collect soil and vegetation that makes them even more effective. Silt and root systems can actually act as bonding agents within the basket. But, they can also bond the riprap on the interior of the gabion basket with the natural soil and roots on the exterior. When the gabion becomes one with the subsoil and earth over which it is laying, it becomes ever stronger and more effective.
Durability of These Structures
Gabion basket structures will last as long as the wire lasts. That is to say, the rocks and rubble within the structure do not determine its lifespan. The metal wires are always the first things to go. This lifespan of the wire will depend on the exact type of metal used on the gabion and the contents of the soil.
Some soils are more corrosive than others. Some soils have acids and naturals fluids that make metal rust and deteriorate over time. Usually, if a soil is wetter it will also be more corrosive. Some drier soils can prolong the life of the metals used in gabion basket structures. No matter what type of soil you have you may want to have it test by a contractor to make sure you choose the right metal. Different treatment processes can make the metal stronger. The properly treated type of wire will ensure that your wall will last for a long time.
When natural foliage, plants, and shrubbery grow over your gabion basket structures, they can be virtually hidden. Most people are weary of installing the mesh wiring in their yards because it is not consider very aesthetically pleasing for residential usage. There are many ways to mask your gabion cages. Most plants will not be able to grow successfully because their roots cannot flourish in the riprap. But some shrubs and grasses can certainly be healthy and look beautiful while covering your gabion.
When it comes to building your Gabion basket structures, you should leave the task to professional contractors. Whenever you hire a landscape contractor make sure that they are licensed, bonded, and insured within your home state. The company you hire should have civil engineers who will examine your soil and determine the best materials and specifications for your Gabion basket structures.
They will be able to ensure that your structures look good and are strong. If you hire contractors who do not have the proper credentials you have no insurance that you wall will actually do its job. These walls are perfect for large scale engineering jobs but also feasible in smaller residential and commercial settings.
#9. Limestone
#10. Natural stone
#11. Reinforced concrete
#12. Detention Structures
Detention structures are great to install in your yard to help control erosion. Much like shotcrete walls and soil nails, they can be used for large scale erosion prevention but they can also be constructed on small scales for residential landscaping usage. They can be particularly useful if you have a naturally occurring pond or lake in your yard. Detention structures can be ideal for areas that are subject to much rainfall and moisture as well. They can funnel ground run off into a controllable stream. These can greatly reduce the effects of storm water run off in many residential environments. They are also ideal for drawing water away from your lawn and controlling the moisture content of subsoil.
Growing Better Lawns And Gardens
Many people have troubles growing healthy lawns, plants, bushes, flowers, and gardens. There are obviously many factors that will contribute or detract from the health of agriculture. Perhaps one of the most important elements in growing any type of plant is maintaining healthy subsoil. But keeping a subsoil prime for planting requires structures of detention to properly manage the moisture content of the soil. But, keeping soil properly watered is not merely a matter of watering it on the surface.
The natural water movement that occurs far beneath the surface largely determines the moisture content of subsoil. Of course, this can be very hard to manage, as is not always a matter of making sure there is enough water; sometimes too much water can prevent planting in soils. In many residential environments, the underwater flow of water is not substantial enough to affect the soil. This is usually the case in tract homes. But, many people live in homes that need detention structures because their yards are largely in wooded or hilled areas.
Detention structures are ideal for wet environments. Detention structures are ideal for yards that have rivers, ponds, streams, or lakes running through them or nearby. Underground water tables may also require detention structures. With a detention structure you an maintain the flow of this water and keep the moisture content of your soil at a perfect level for whatever type of planting you are doing in your yard.
Professional Engineer Consultation
Whenever you are going to have a detention structure installed in your yard or on any of your properties, be sure to have the land examined by a professional engineer. The process is fairly complicated and an engineering expert in soils and natural storm water run off must evaluate the structures. An expert engineer, in coordination with a contractor, will be able to help you determine the necessary size and style of the structures necessary for your yard. The design and construction of these structures is not a task that you should take on yourself. It is very detailed work that requires professional analysis and customization for each detention unit.
Whenever you hire a contractor to install your detention structures, make sure that they are licensed, bonded, and insured within your home state. There are many reasons why you should only hire professional contractors with the proper credentials. First, you need to be sure that they have the experience and know-how to complete the job. This is why it is always a good idea to ask to see examples of their work and speak to other customers who have hired them. You also want to make sure the contractor is insured so that you are covered if any injuries befall the workers during the construction.
Insurance will also protect you from any collateral damage that could occur during the installation. For instance, if your contracting crew is insured they will be able to fix or pay for the repair in the event that a pipe is broken while digging. There are many things that could go wrong during the construction of structures so you want to be sure that you hire a properly credentialed crew to handle you detention units. It is the only way to insure that you are not held financially or legally culpable for any problems that may occur during the process.
Having detention structures installed in your yard is very smart if you live a wet area that is particularly subject to heavy storms. Strom run off can contaminate soils and ruin soil. With a detention structure on your property you can reduce the affects of storm run off and keep your soil healthy. There are many different types of detention structures that can be installed on your property. Many homeowners are reluctant to have them installed because they can be ugly concrete structures. But you can customize any structure with brick or stone to make it more aesthetically pleasing. It is also possible to mask the units with plants and shrubbery to beautify your yard.
===================
With this in mind, it is essential to choose the proper material for your walls. A higher wall needs to be considerably more rigid than a wall that only comes a few inches off the ground.
Because of its properties, concrete is generally the material of choice when building retaining walls. However, many people use less rigid materials and choose to reinforce them with concrete, metal, or other strong materials to hold the soil in place.
This works for the most part, but this type of retaining wall does not hold up as long as a properly installed retaining wall. A brace should be considered for behind the wall, no matter the material. Bracing the wall now may save you from messy and expensive repairs later. Higher walls also need to be thicker than lower walls, as this helps to even the forces out.
When considering installing retaining walls, you should decide where you would like them, how large of an area the elevated yard will be, and what material you would like the wall made from.
Skilled retaining wall experts can be helpful in assisting you in this process, as they have valuable experience that can help in making your decisions. An expert can bring you pictures of different styles of retaining walls, and possibly even samples of wall materials to help you better understand the look and feel of your new wall.
Retaining wall pictures are taken from previous clients, and are a good example of what you wish to build in your yard. They can also help decide whether the mason or carpenter in question is a good candidate to build your walls. You must also remember that installing retaining walls is labor-intensive, as each individual brick or piece must be laid in and leveled out before moving on to the next piece.
Retaining Walls: DIY or Hire a Professional for your Project
Of course, not everyone would want to go to a professional, considering the cost. Building your own retaining walls can be a rewarding project. You will have the self-satisfaction of knowing you can perform your own landscaping, and make it something you are proud of. Your retaining wall design will be one of a kind, created and built by you. Be sure to check all building code regulations in your area, as most places do not allow homeowners to build walls over three feet unless hiring a professional to do it for them, and you may need a building permit.
If all of the proper precautions are taken, you will find it simple to construct a lasting retaining wall. Beautiful landscaping not only is lovely to look at, but raises your home’s value. There is a world of materials available to you; a bit of creativity is all it takes to make your home the home of your dreams. Whether you choose to undertake this project yourself or get professional help, there is a great deal you can learn from this process.
Using a Retaining Wall Around a Pool
If you have a pool in your backyard or are thinking of installing one, then you may need to give some consideration to the benefits of retaining walls. A retaining wall can actually make it more possible to install a pool in a backyard that is sloped.
In addition, such a wall might also be able to provide you with a lot more aesthetic benefits. You can get a great new piece of architectural work that is going to make installing your pool a cinch, and it will be something that everyone can enjoy looking at in your family.
Why Choose a Retaining Wall
You can choose to highlight the beauty of your retaining wall by choosing to add some luscious plants and greenery to it, or you can even choose to incorporate some fountains. That would actually work well and can really tie the look of your retaining wall into the look of the pool. You can create a functional retaining wall that is going to provide you with the opportunity to have even more lovely focal points in your backyard.
You can also use a retaining wall around a pool to offer you some really great opportunities to create certain architectural elements. For instance, you can shape your wall into a series of steps that lead down into your pool. You can even choose to line these steps with some really great plants or flowers. This will make your whole pool area a lot more attractive. Choosing this option will prove that retaining walls can be really functional and decorative at the same time.
Making Decorative Choices
If you have decided on adding a retaining wall near your pool, then you’re making a really good decision already. This is a choice that is definitely going to make your whole pool area look a bit more fun and elegant. One of the first things that you should consider is what you want your retaining wall to look like. This is very important if you are putting it near a pool, as it is going to be something that lots of people will look at from day to day. You need to make sure that you choose something that is going to match the concrete, tile, or other material that you have chosen for the area around your pool.
It’s a good idea for you to consider your budget first before you make any of these decorative choices. It can be really expensive to build a pool in your home, and choosing a retaining wall as a design element can also be really expensive. As such, you need to make sure that you can afford to install both of these things at once. It might be too much to take on at one time, so you may have to space things out.
Once you do make some decisions regarding your budget, then you can start choosing products. There are a lot of different options out there, so you can be sure to find something that is really going to highlight the beauty of your pool. You can really spend as much money on the project as you are comfortable spending, as there are some really elegant materials out there to choose from. If you have decided on using a retaining wall around a pool, then make it as beautiful as you possibly can.